Scan pages 25–28 (+ S-EN1-960 p. 26)
Troubleshooting & Diagrams
XI. Trouble Shooting Chart
Section "A" Troubles with Amplifier
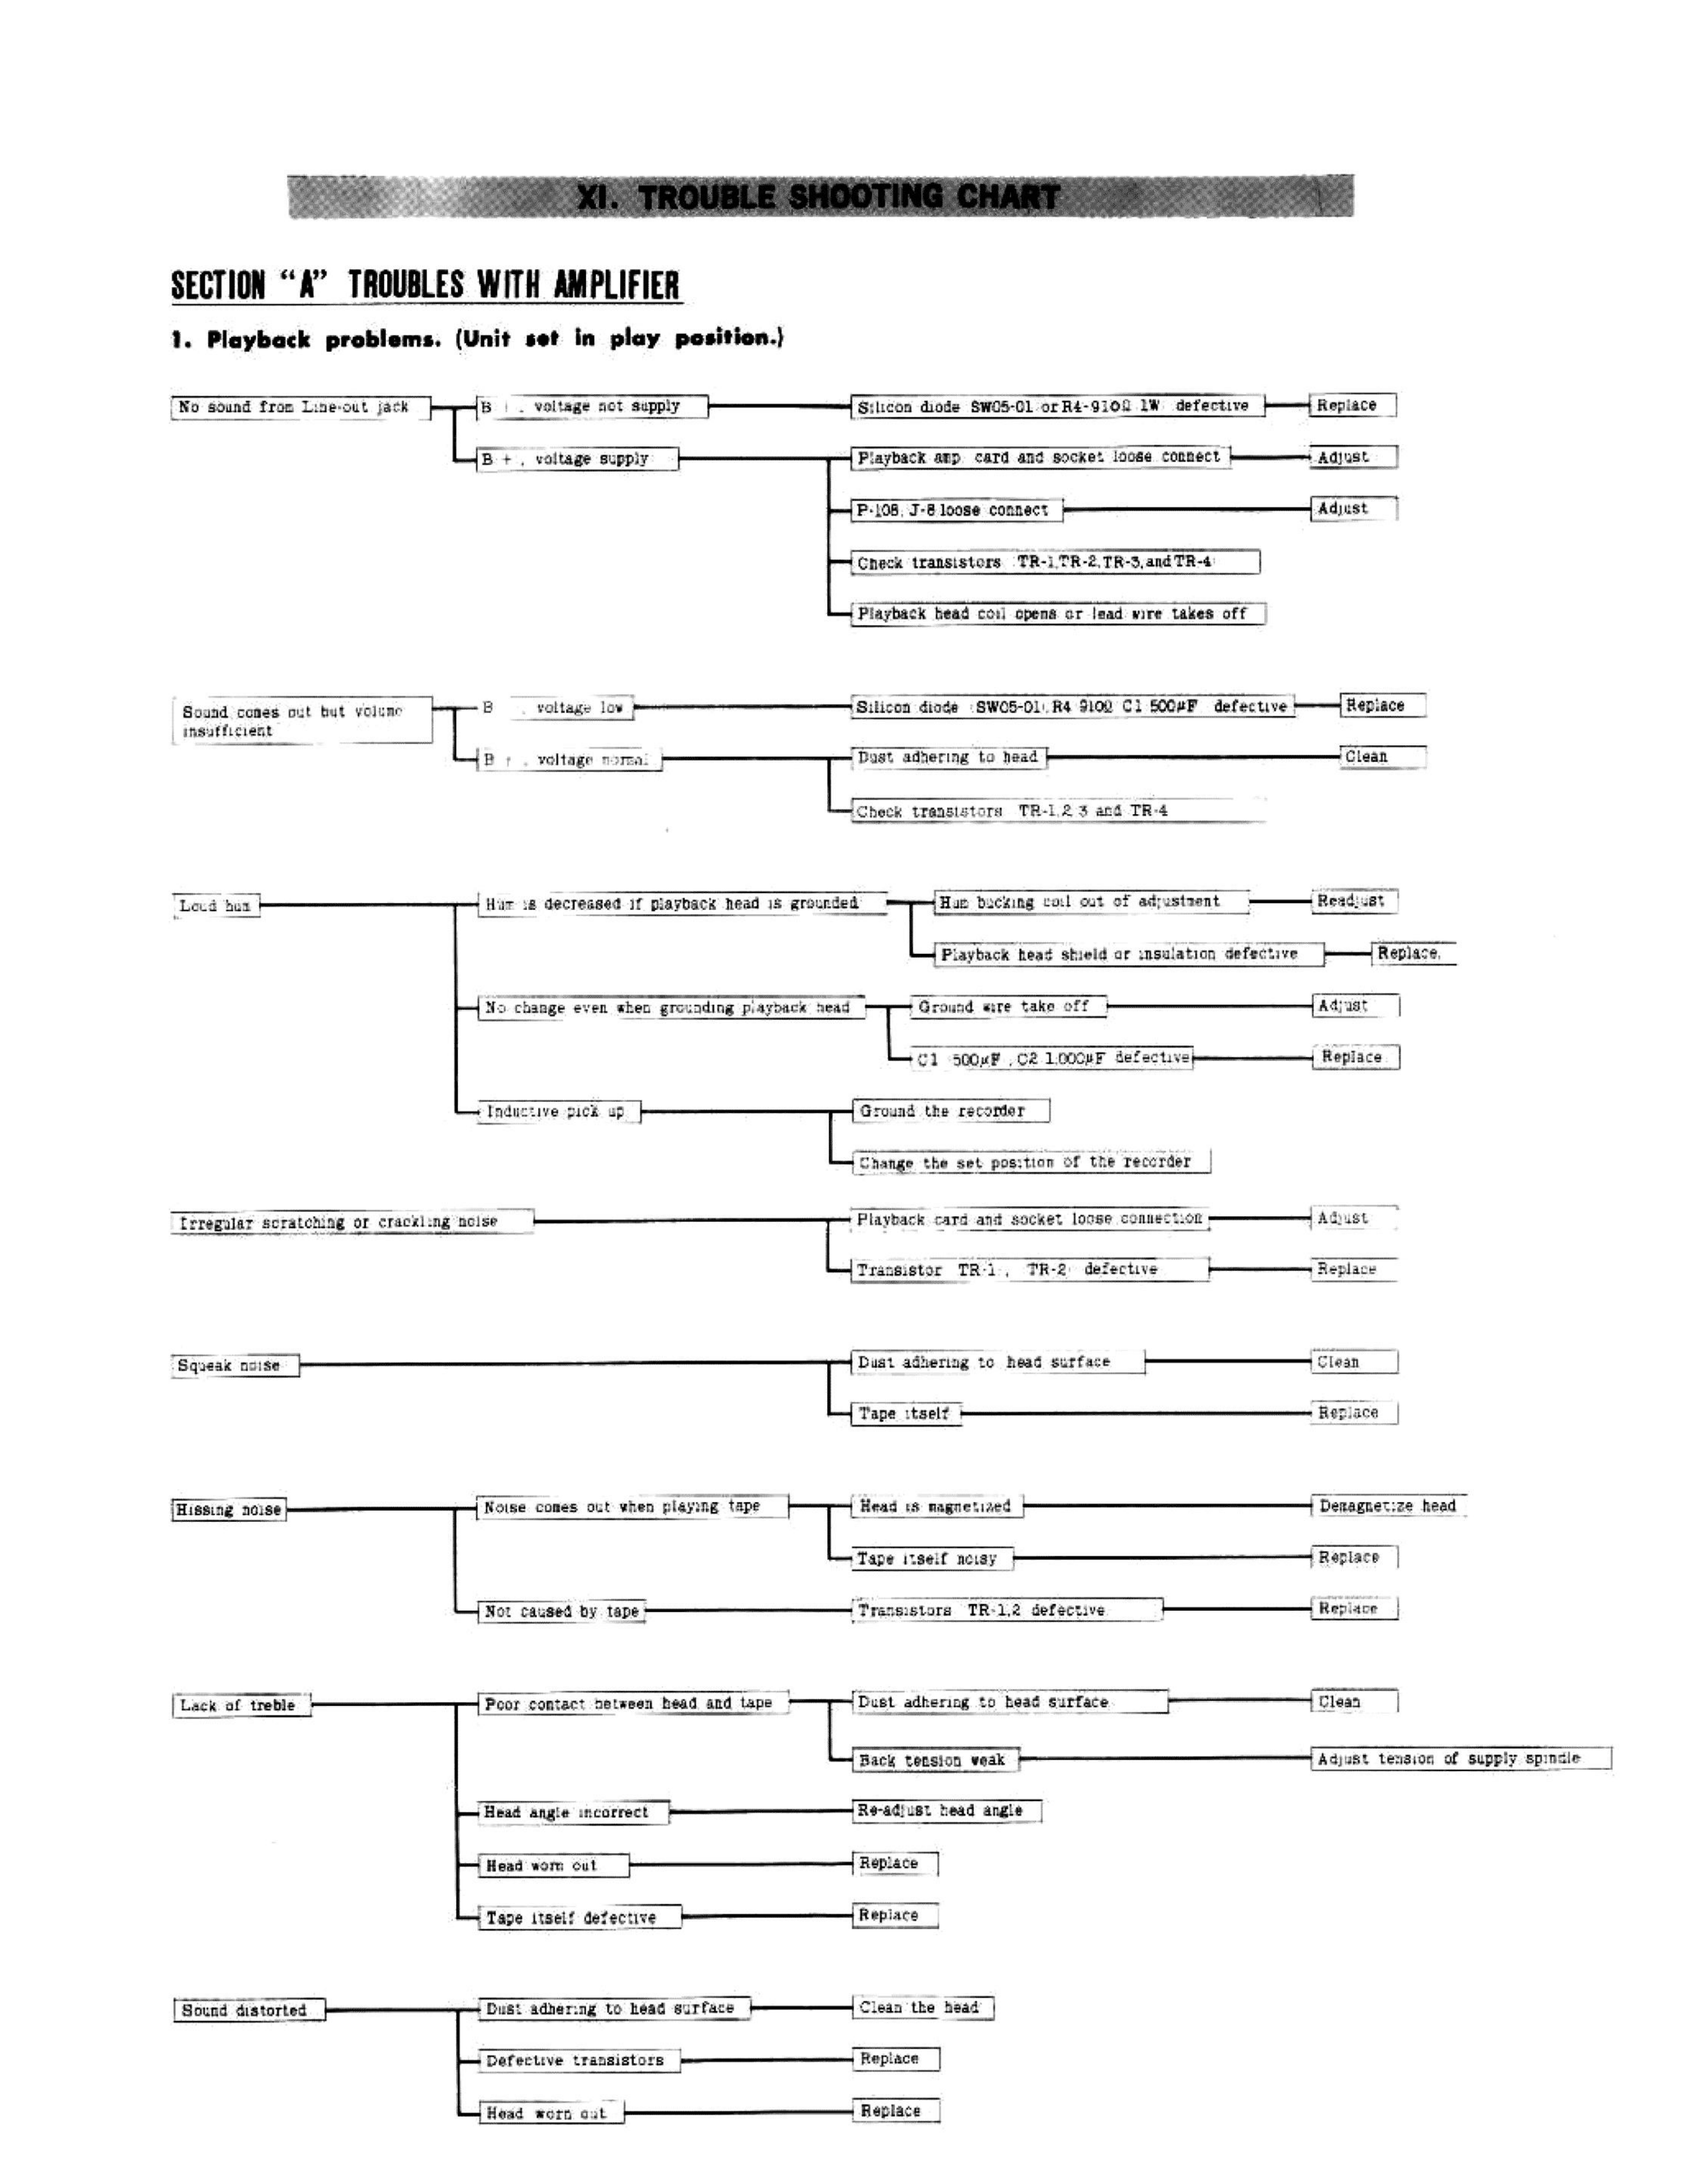 ⤢ zoomSection A troubleshooting flow-chart for amplifier troubles: playback problems branching through B+ voltage checks, hum, noise, treble loss, and distortion symptoms to their causes and remedies
1. Playback problems. (Unit set in play position.)
- No sound from Line-out jack
- B+. voltage not supply
- Silicon diode SW05-01 or R4-91Ω 1W defective
- Replace
- Silicon diode SW05-01 or R4-91Ω 1W defective
- B +. voltage supply
- Playback amp. card and socket loose connect
- Adjust
- P-108, J-8 loose connect
- Adjust
- Check transistors TR-1, TR-2, TR-3, and TR-4
- Playback head coil opens or lead wire takes off
- Playback amp. card and socket loose connect
- B+. voltage not supply
- Sound comes out but volume insufficient
- B+. voltage low
- Silicon diode SW05-01, R4 91Ω, C1 500μF defective
- Replace
- Silicon diode SW05-01, R4 91Ω, C1 500μF defective
- B +. voltage normal
- Dust adhering to head
- Clean
- Check transistors TR-1,2,3 and TR-4
- Dust adhering to head
- B+. voltage low
- Loud hum
- Hum is decreased if playback head is grounded
- Hum bucking coil out of adjustment
- Readjust
- Playback head shield or insulation defective
- Replace.
- Hum bucking coil out of adjustment
- No change even when grounding playback head
- Ground wire take off
- Adjust
- C1 500μF, C2 1,000μF defective
- Replace
- Ground wire take off
- Inductive pick up
- Ground the recorder
- Change the set position of the recorder
- Hum is decreased if playback head is grounded
- Irregular scratching or crackling noise
- Playback card and socket loose connection
- Adjust
- Transistor TR-1, TR-2 defective
- Replace
- Playback card and socket loose connection
- Squeak noise
- Dust adhering to head surface
- Clean
- Tape itself
- Replace
- Dust adhering to head surface
- Hissing noise
- Noise comes out when playing tape
- Head is magnetized
- Demagnetize head
- Tape itself noisy
- Replace
- Head is magnetized
- Not caused by tape
- Transistors TR-1,2 defective
- Replace
- Transistors TR-1,2 defective
- Noise comes out when playing tape
- Lack of treble
- Poor contact between head and tape
- Dust adhering to head surface
- Clean
- Back tension weak
- Adjust tension of supply spindle
- Dust adhering to head surface
- Head angle incorrect
- Re-adjust head angle
- Head worn out
- Replace
- Tape itself defective
- Replace
- Poor contact between head and tape
- Sound distorted
- Dust adhering to head surface
- Clean the head
- Defective transistors
- Replace
- Head worn out
- Replace
- Dust adhering to head surface
2. Recording problems. (Unit plays back pre-recorded tapes okay, but recording not satisfactory.)
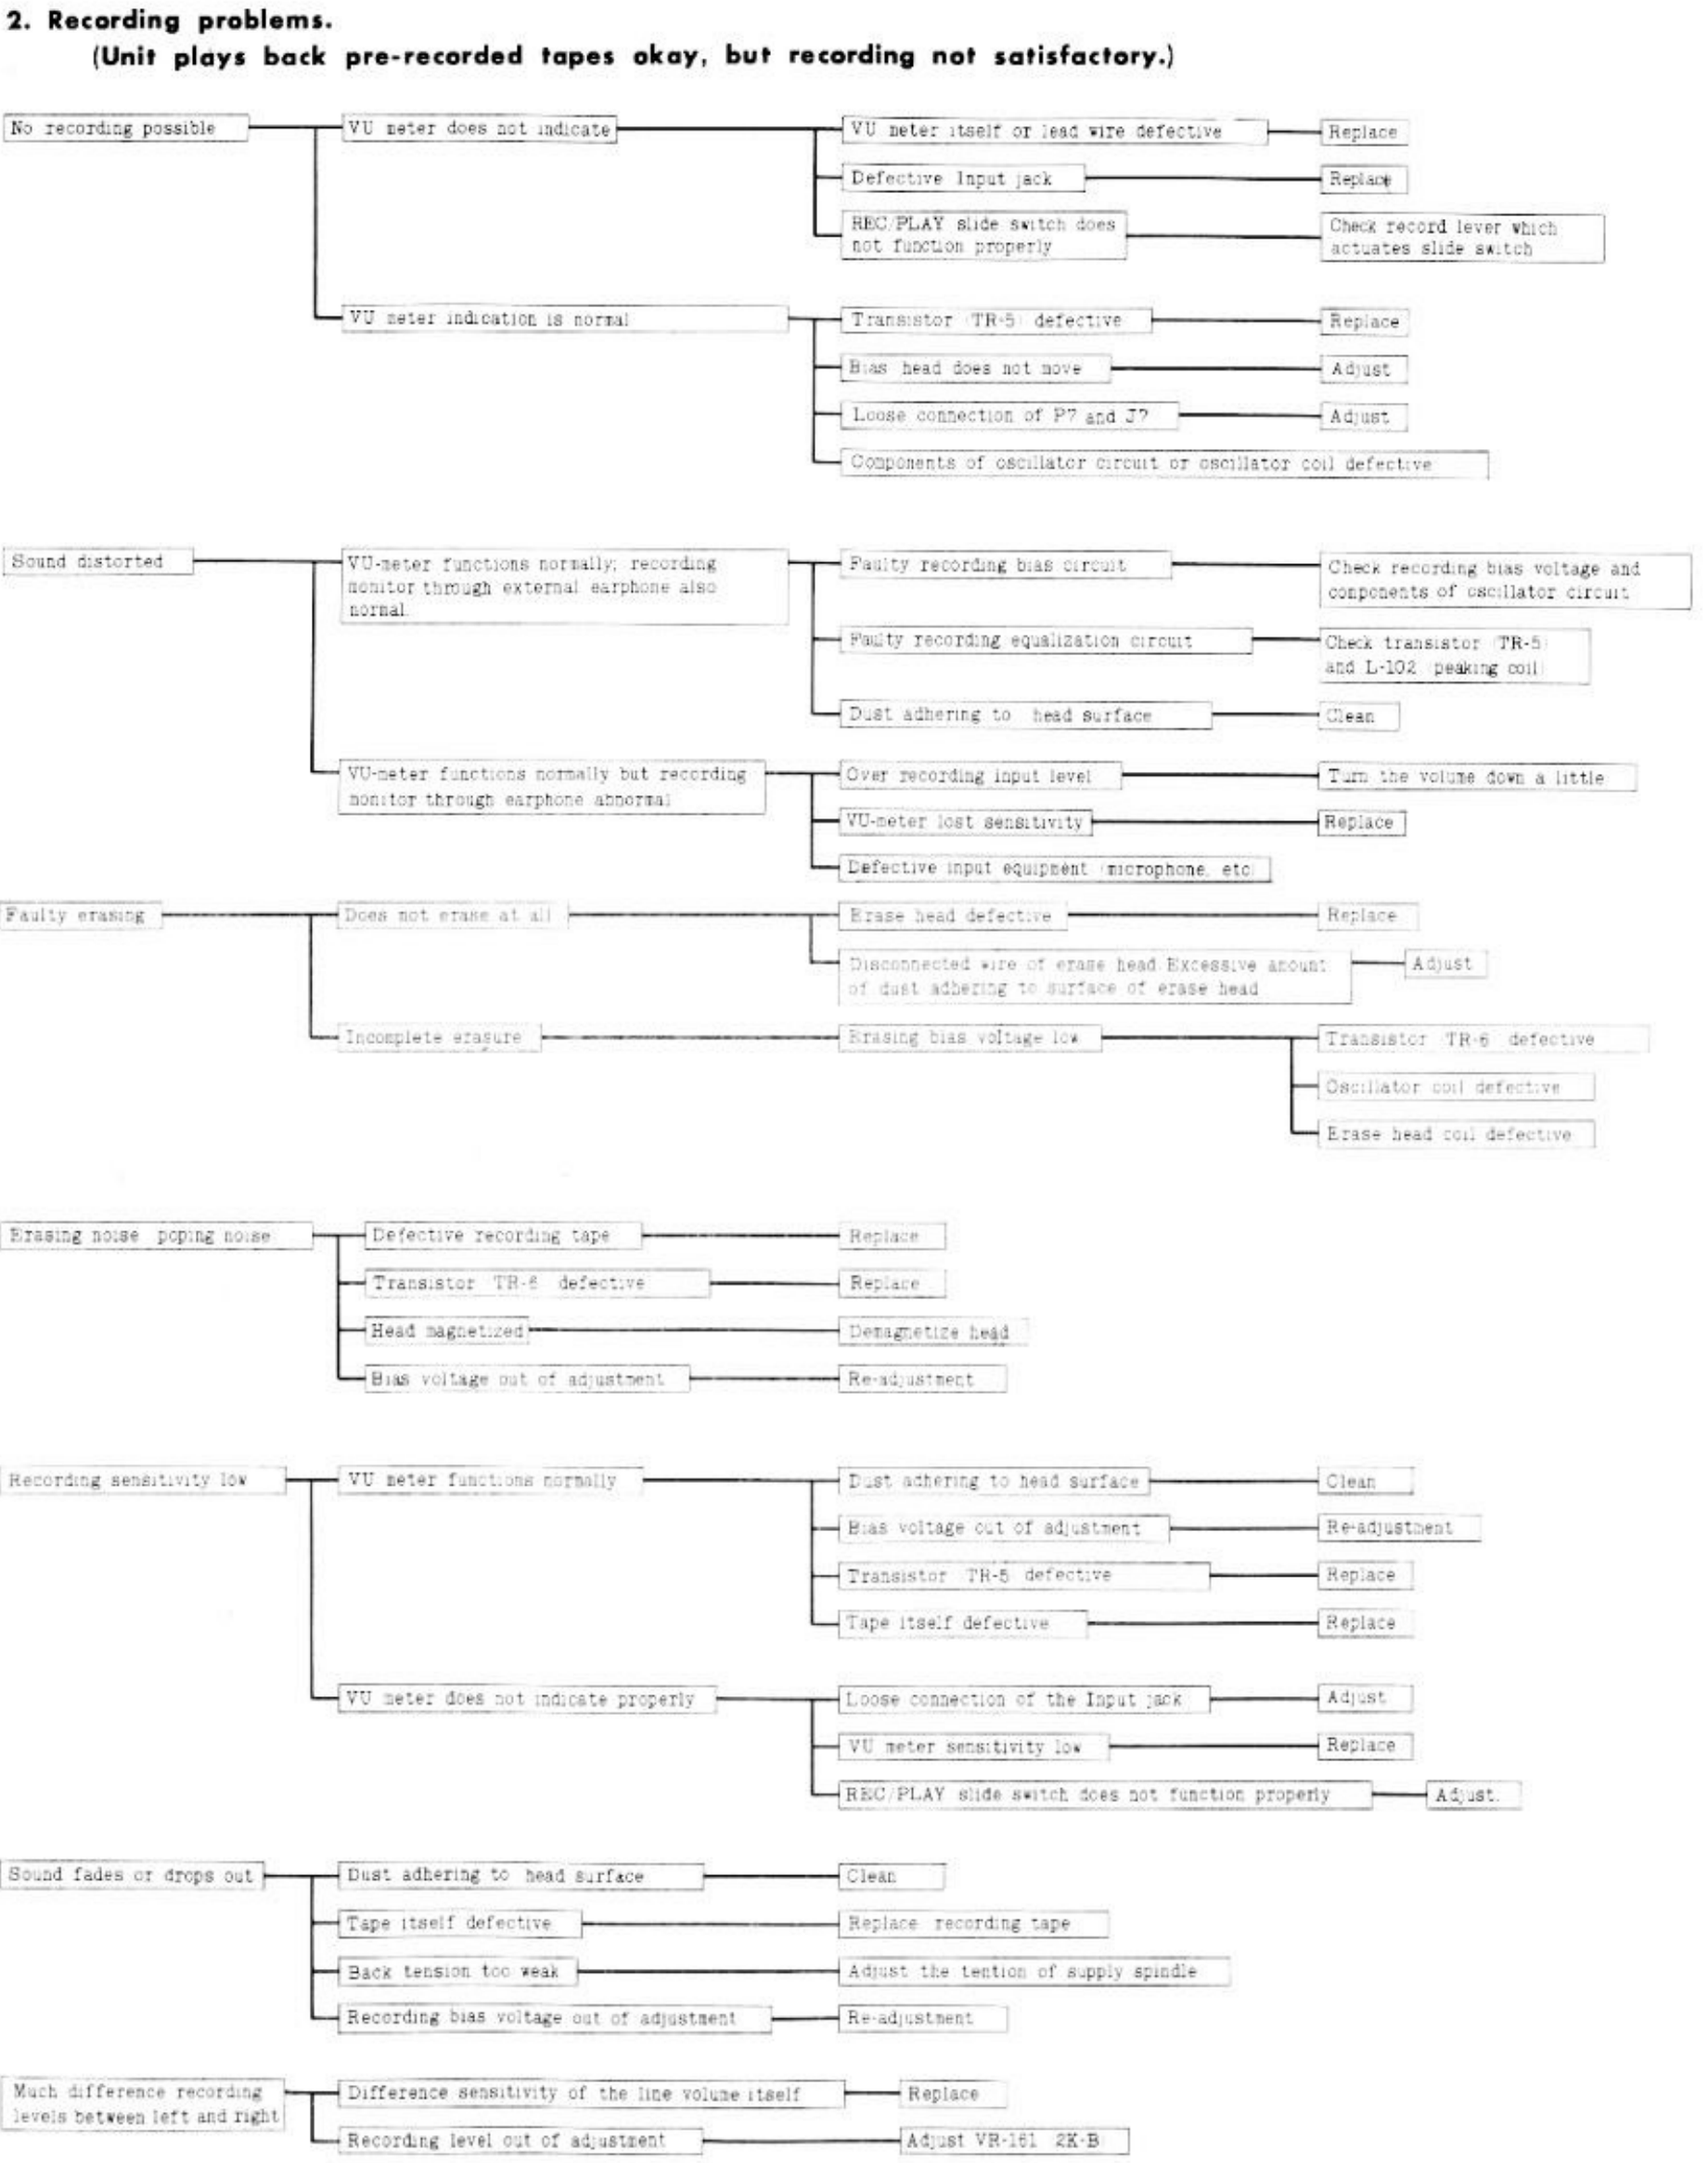 ⤢ zoomSection A troubleshooting flow-chart, sheet 2: recording problems branching from no-recording, distortion, faulty-erasing, noise, sensitivity, drop-out, and channel-imbalance symptoms to their causes and remedies
- No recording possible
- VU meter does not indicate
- VU meter itself or lead wire defective
- Replace
- Defective Input jack
- Replace
- REC/PLAY slide switch does not function properly
- Check record lever which actuates slide switch
- VU meter itself or lead wire defective
- VU meter indication is normal
- Transistor (TR-5) defective
- Replace
- Bias head does not move
- Adjust
- Loose connection of P7 and J?
- Adjust
- Components of oscillator circuit or oscillator coil defective
- Transistor (TR-5) defective
- VU meter does not indicate
- Sound distorted
- VU-meter functions normally; recording monitor through external earphone also normal.
- Faulty recording bias circuit
- Check recording bias voltage and conponents of oscillator circuit
- Faulty recording equalization circuit
- Check transistor (TR-5) and L-102 (peaking coil)
- Dust adhering to head surface
- Clean
- Faulty recording bias circuit
- VU-meter functions normally but recording monitor through earphone abnormal
- Over recording input level
- Turn the volume down a little
- VU-meter lost sensitivity
- Replace
- Defective input equipment (microphone, etc)
- Over recording input level
- VU-meter functions normally; recording monitor through external earphone also normal.
- Faulty erasing
- Does not erase at all
- Erase head defective
- Replace
- Disconnected wire of erase head. Excessive amount of dust adhering to surface of erase head
- Adjust
- Erase head defective
- Incomplete erasure
- Erasing bias voltage low
- Transistor (TR-6) defective
- Oscillator coil defective
- Erase head coil defective
- Erasing bias voltage low
- Does not erase at all
- Erasing noise poping noise
- Defective recording tape
- Replace
- Transistor (TR-6) defective
- Replace
- Head magnetized
- Demagnetize head
- Bias voltage out of adjustment
- Re-adjustment
- Defective recording tape
- Recording sensitivity low
- VU meter functions normally
- Dust adhering to head surface
- Clean
- Bias voltage out of adjustment
- Re-adjustment
- Transistor (TR-5) defective
- Replace
- Tape itself defective
- Replace
- Dust adhering to head surface
- VU meter does not indicate properly
- Loose connection of the Input jack
- Adjust
- VU meter sensitivity low
- Replace
- REC/PLAY slide switch does not function properly
- Adjust.
- Loose connection of the Input jack
- VU meter functions normally
- Sound fades or drops out
- Dust adhering to head surface
- Clean
- Tape itself defective
- Replace recording tape
- Back tension too weak
- Adjust the tention of supply spindle
- Recording bias voltage out of adjustment
- Re-adjustment
- Dust adhering to head surface
- Much difference recording levels between left and right
- Difference sensitivity of the line volume itself
- Replace
- Recording level out of adjustment
- Adjust VR-161 2K-B
- Difference sensitivity of the line volume itself
Section "B" Troubles with Tape Transport Mechanism
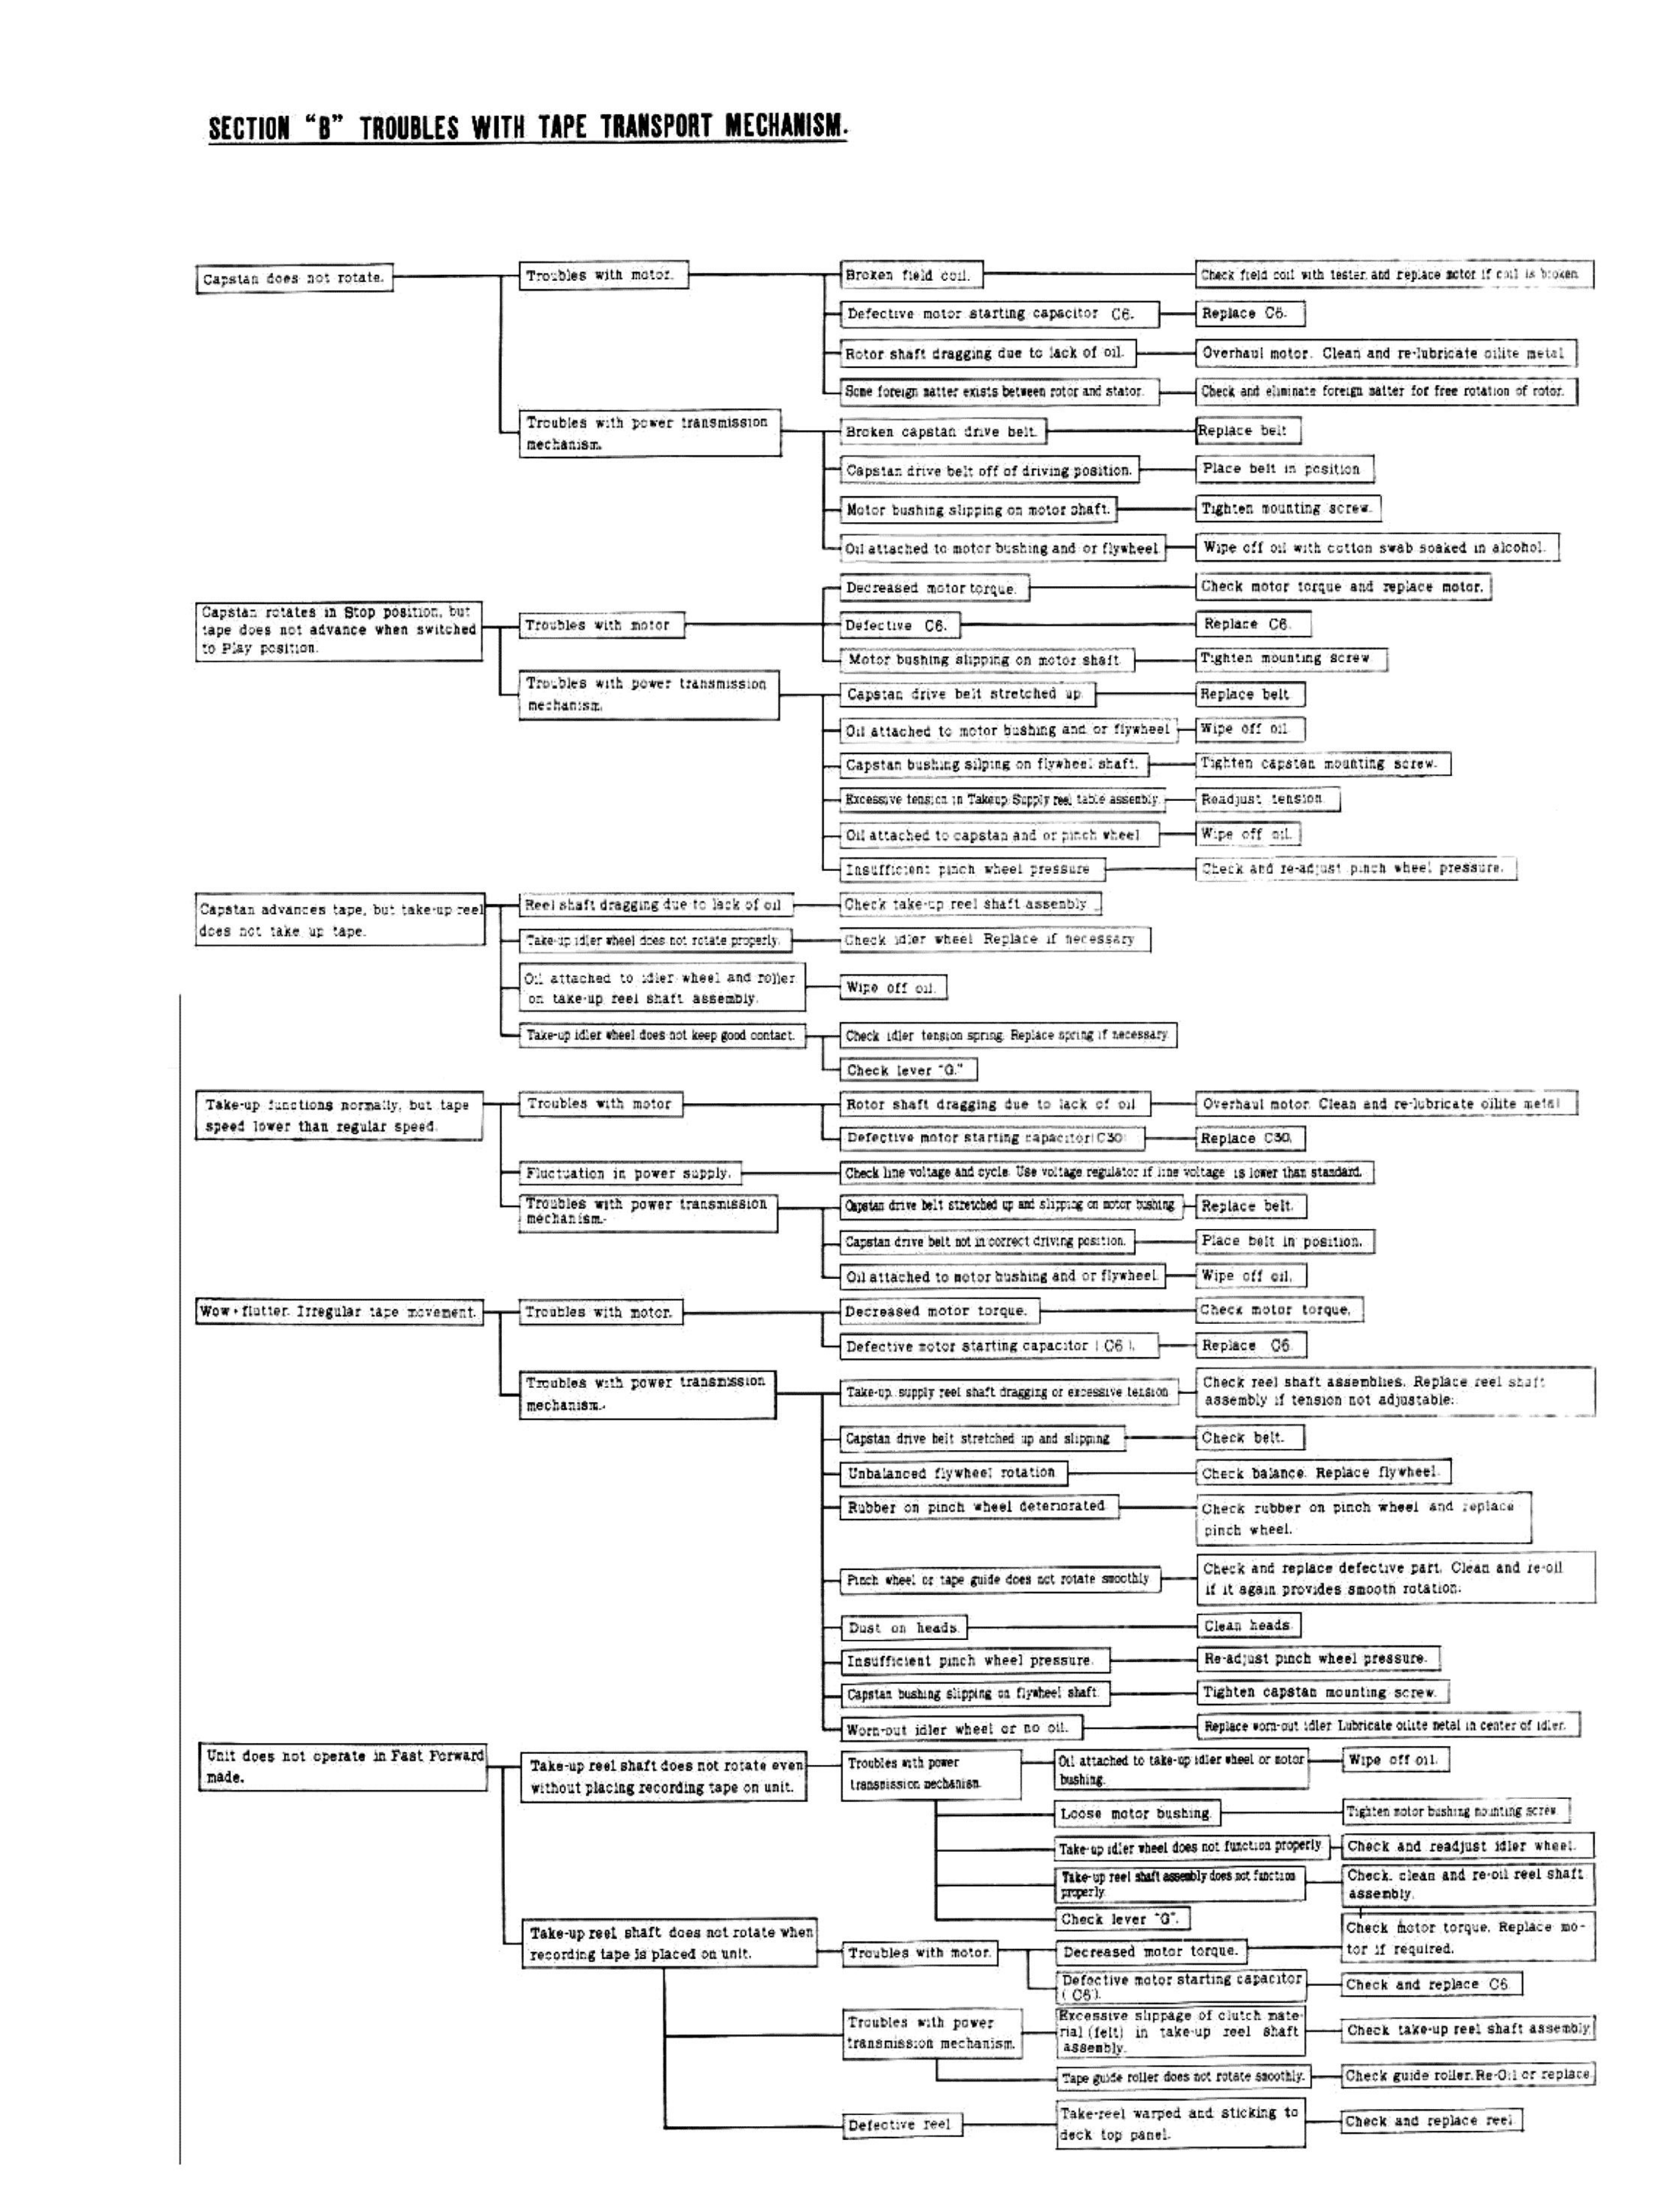 ⤢ zoomSection B troubleshooting flow-chart, sheet 1 of 2: tape transport troubles from capstan rotation faults through take-up, wow-and-flutter, and fast-forward symptoms to their causes and remedies
- Capstan does not rotate.
- Troubles with motor.
- Broken field coil.
- Check field coil with tester, and replace motor if coil is broken
- Defective motor starting capacitor C6.
- Replace C6.
- Rotor shaft dragging due to lack of oil.
- Overhaul motor. Clean and re-lubricate oilite metal
- Some foreign matter exists between rotor and stator.
- Check and eliminate foreign matter for free rotation of rotor.
- Broken field coil.
- Troubles with power transmission mechanism.
- Broken capstan drive belt.
- Replace belt
- Capstan drive belt off of driving position.
- Place belt in position
- Motor bushing slipping on motor shaft.
- Tighten mounting screw.
- Oil attached to motor bushing and/or flywheel
- Wipe off oil with cotton swab soaked in alcohol.
- Broken capstan drive belt.
- Troubles with motor.
- Capstan rotates in Stop position, but tape does not advance when switched to Play position.
- Troubles with motor
- Decreased motor torque.
- Check motor torque and replace motor.
- Defective C6.
- Replace C6.
- Motor bushing slipping on motor shaft
- Tighten mounting screw
- Decreased motor torque.
- Troubles with power transmission mechanism.
- Capstan drive belt stretched up.
- Replace belt
- Oil attached to motor bushing and/or flywheel
- Wipe off oil
- Capstan bushing silping on flywheel shaft.
- Tighten capstan mounting screw.
- Excessive tension in Take-up Supply reel table assembly
- Readjust tension
- Oil attached to capstan and/or pinch wheel
- Wipe off oil.
- Insufficient pinch wheel pressure
- Check and re-adjust pinch wheel pressure.
- Capstan drive belt stretched up.
- Troubles with motor
- Capstan advances tape, but take-up reel does not take up tape.
- Reel shaft dragging due to lack of oil
- Check take-up reel shaft assembly
- Take-up idler wheel does not rotate properly.
- Check idler wheel. Replace if necessary
- Oil attached to idler wheel and roller on take-up reel shaft assembly.
- Wipe off oil.
- Take-up idler wheel does not keep good contact.
- Check idler tension spring. Replace spring if necessary
- Check lever "[illegible]."
- Reel shaft dragging due to lack of oil
- Take-up functions normally, but tape speed lower than regular speed.
- Troubles with motor
- Rotor shaft dragging due to lack of oil
- Overhaul motor. Clean and re-lubricate oilite metal
- Defective motor starting capacitor (C30).
- Replace C30.
- Rotor shaft dragging due to lack of oil
- Fluctuation in power supply.
- Check line voltage and cycle. Use voltage regulator if line voltage is lower than standard.
- Troubles with power transmission mechanism.
- Capstan drive belt stretched up and slipping on motor bushing
- Replace belt.
- Capstan drive belt not in correct driving position.
- Place belt in position.
- Oil attached to motor bushing and/or flywheel.
- Wipe off oil.
- Capstan drive belt stretched up and slipping on motor bushing
- Troubles with motor
- Wow-flutter. Irregular tape movement.
- Troubles with motor.
- Decreased motor torque.
- Check motor torque.
- Defective motor starting capacitor (C6).
- Replace C6
- Decreased motor torque.
- Troubles with power transmission mechanism.
- Take-up/supply reel shaft dragging or excessive tension
- Check reel shaft assemblies. Replace reel shaft assembly if tension not adjustable.
- Capstan drive belt stretched up and slipping
- Check belt.
- Unbalanced flywheel rotation
- Check balance. Replace flywheel.
- Rubber on pinch wheel deteriorated
- Check rubber on pinch wheel and replace pinch wheel.
- Pinch wheel or tape guide does not rotate smoothly
- Check and replace defective part. Clean and re-oil if it again provides smooth rotation.
- Dust on heads.
- Clean heads.
- Insufficient pinch wheel pressure.
- Re-adjust pinch wheel pressure.
- Capstan bushing slipping on flywheel shaft.
- Tighten capstan mounting screw.
- Worn-out idler wheel or no oil.
- Replace worn-out idler. Lubricate oilite metal in center of idler.
- Take-up/supply reel shaft dragging or excessive tension
- Troubles with motor.
- Unit does not operate in Fast Forward mode.
- Take-up reel shaft does not rotate even without placing recording tape on unit.
- Troubles with power transmission mechanism.
- Oil attached to take-up idler wheel or motor bushing.
- Wipe off oil.
- Loose motor bushing.
- Tighten motor bushing mounting screw
- Take-up idler wheel does not function properly.
- Check and readjust idler wheel.
- Take-up reel shaft assembly does not function properly.
- Check, clean and re-oil reel shaft assembly.
- Check lever "[illegible]".
- Oil attached to take-up idler wheel or motor bushing.
- Troubles with power transmission mechanism.
- Take-up reel shaft does not rotate when recording tape is placed on unit.
- Troubles with motor.
- Decreased motor torque.
- Check motor torque. Replace motor if required.
- Defective motor starting capacitor (C6).
- Check and replace C6
- Decreased motor torque.
- Troubles with power transmission mechanism.
- Excessive slippage of clutch material (felt) in take-up reel shaft assembly.
- Check take-up reel shaft assembly
- Tape guide roller does not rotate smoothly.
- Check guide roller. Re-oil or replace
- Excessive slippage of clutch material (felt) in take-up reel shaft assembly.
- Defective reel
- Take-reel warped and sticking to deck top panel.
- Check and replace reel.
- Take-reel warped and sticking to deck top panel.
- Troubles with motor.
- Take-up reel shaft does not rotate even without placing recording tape on unit.
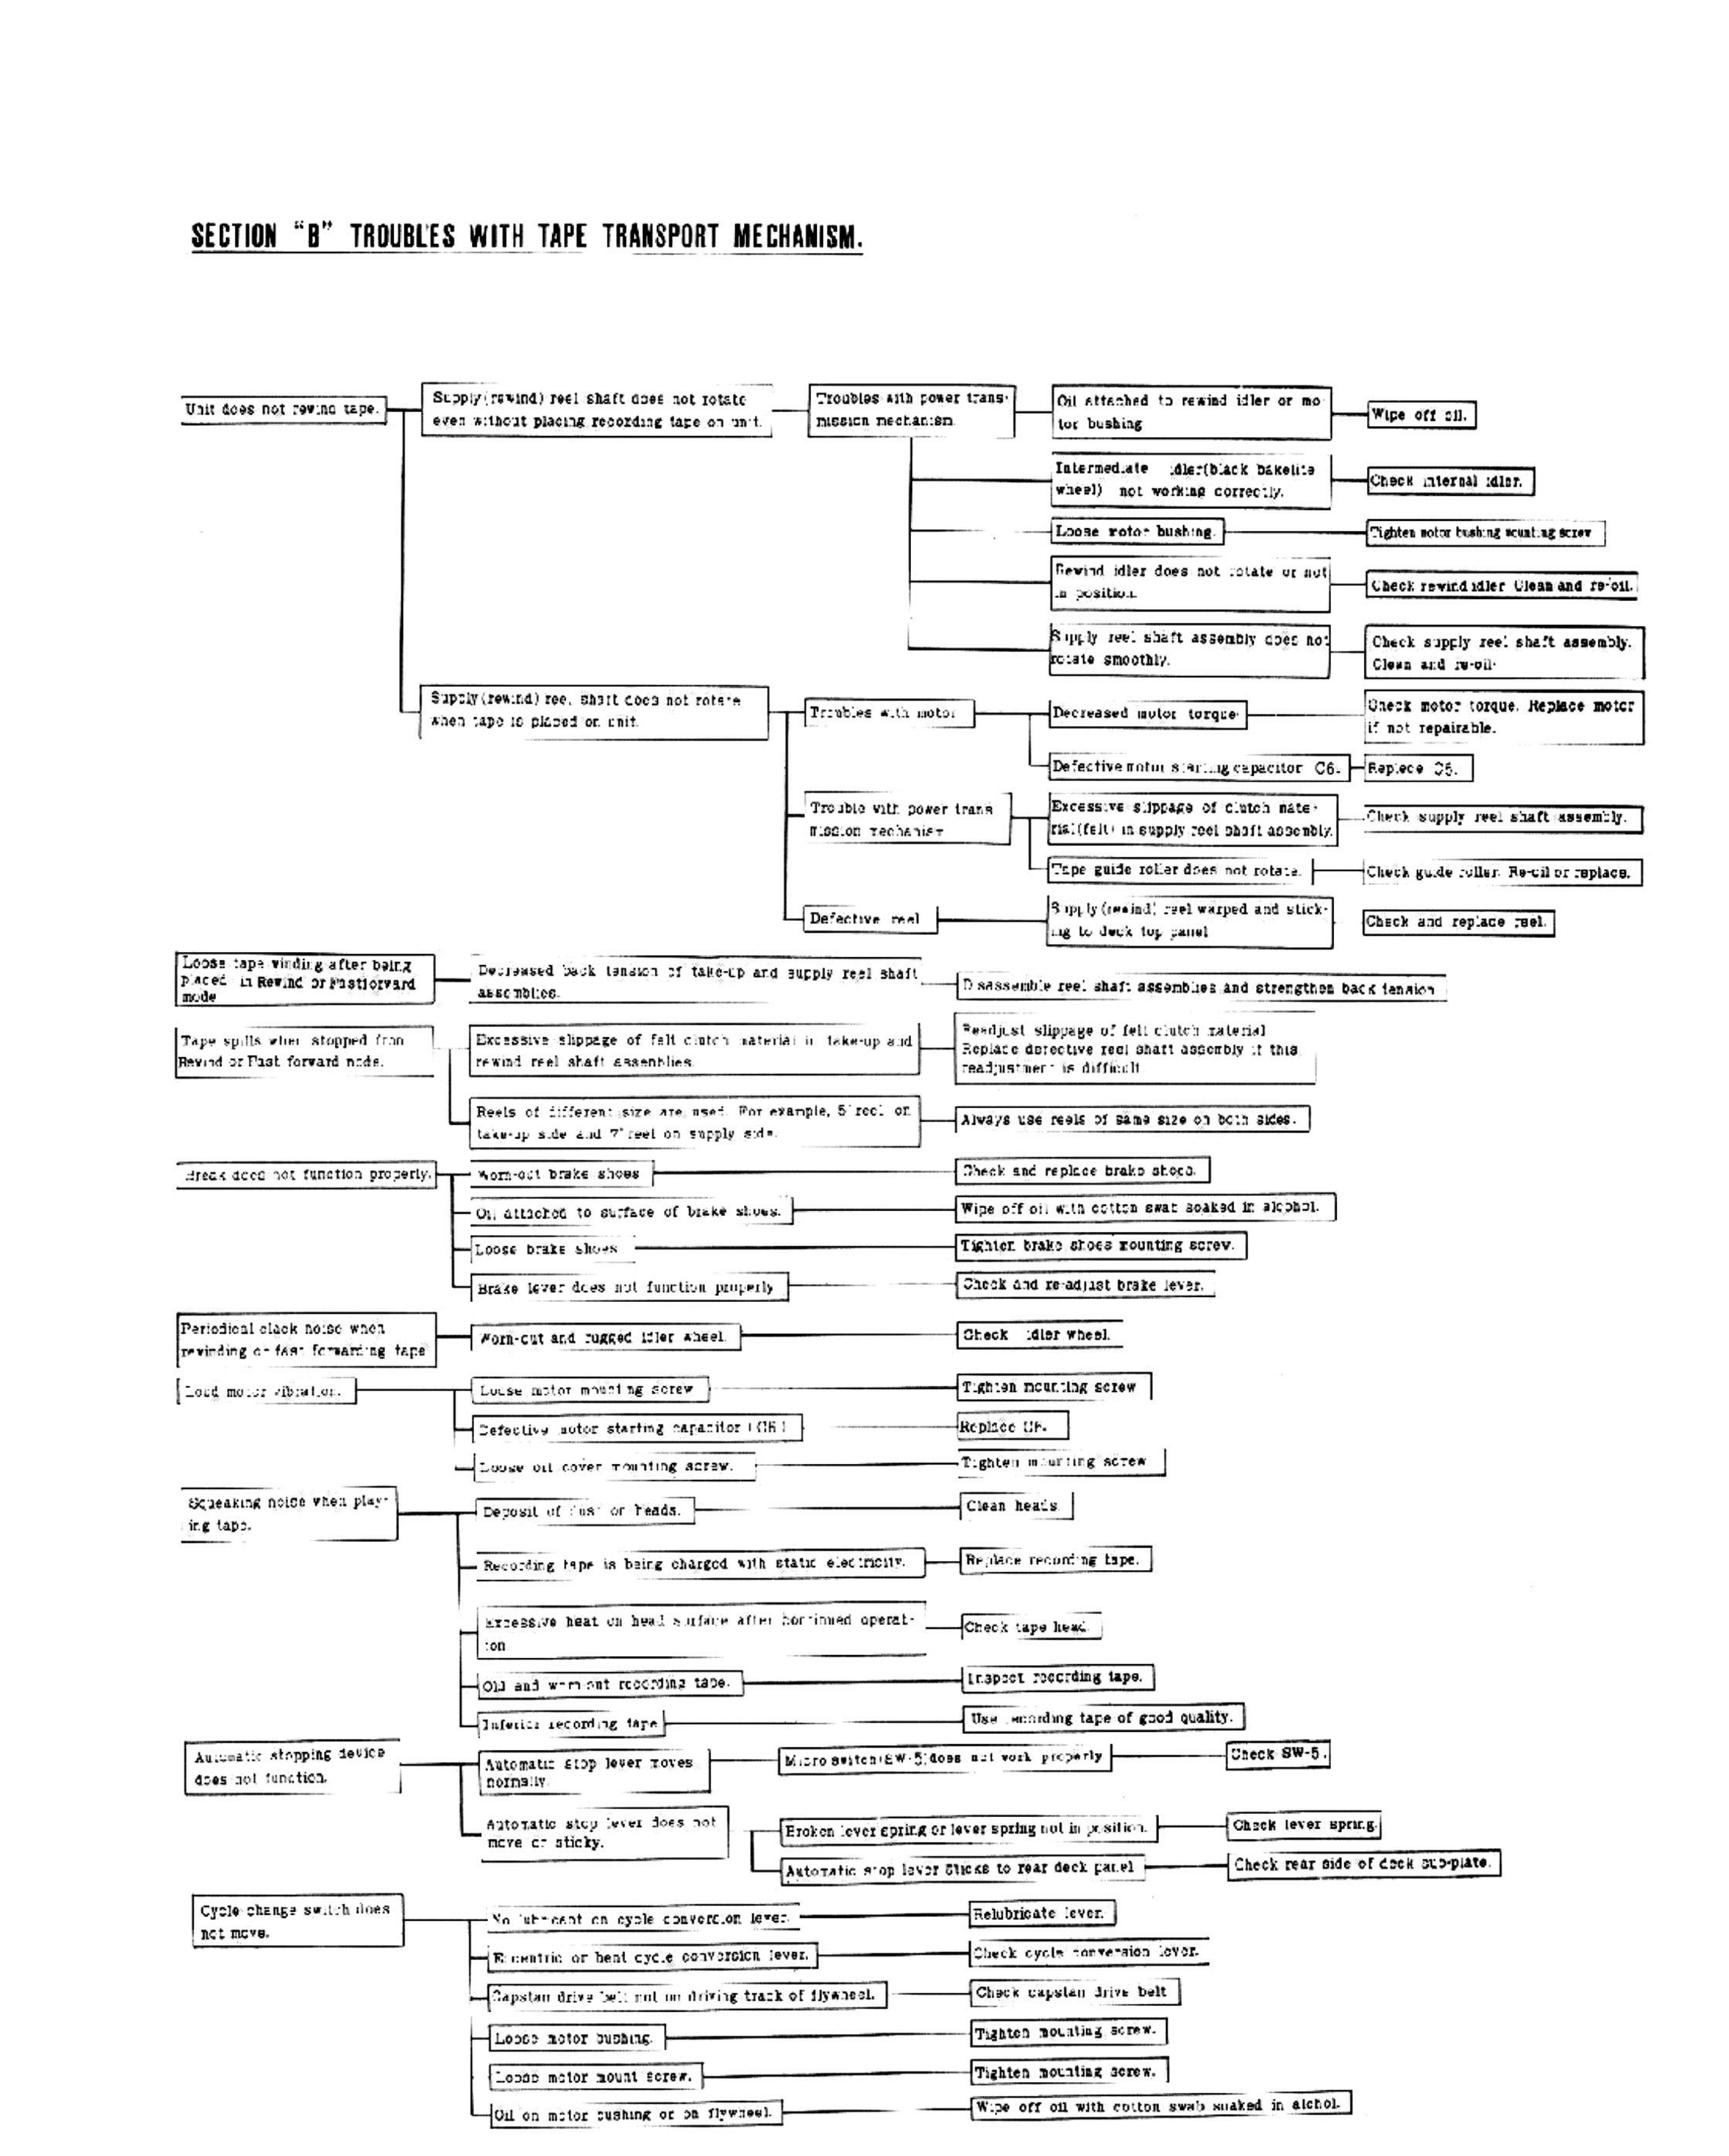 ⤢ zoomSection B troubleshooting flow-chart, sheet 2 of 2: rewind, brake, automatic-stop, and cycle-change-switch troubles, continuing Section B onto a second page with the same header
- Unit does not rewind tape.
- Supply(rewind) reel shaft does not rotate even without placing recording tape on unit.
- Troubles with power transmission mechanism.
- Oil attached to rewind idler or motor bushing
- Wipe off oil.
- Intermediate idler (black bakelite wheel) not working correctly.
- Check internal idler.
- Loose rotor bushing.
- Tighten motor bushing mounting screw
- Rewind idler does not rotate or not in position.
- Check rewind idler. Clean and re-oil.
- Supply reel shaft assembly does not rotate smoothly.
- Check supply reel shaft assembly. Clean and re-oil.
- Oil attached to rewind idler or motor bushing
- Troubles with power transmission mechanism.
- Supply(rewind) reel shaft does not rotate when tape is placed on unit.
- Troubles with motor
- Decreased motor torque
- Check motor torque. Replace motor if not repairable.
- Defective motor starting capacitor C6.
- Replace C6.
- Decreased motor torque
- Trouble with power transmission mechanist
- Excessive slippage of clutch material (felt) in supply reel shaft assembly.
- Check supply reel shaft assembly.
- Tape guide roller does not rotate.
- Check guide roller. Re-oil or replace.
- Excessive slippage of clutch material (felt) in supply reel shaft assembly.
- Defective reel
- Supply(rewind) reel warped and sticking to deck top panel
- Check and replace reel.
- Supply(rewind) reel warped and sticking to deck top panel
- Troubles with motor
- Supply(rewind) reel shaft does not rotate even without placing recording tape on unit.
- Loose tape winding after being placed in Rewind or Fastforward mode
- Decreased back tension of take-up and supply reel shaft assemblies.
- Disassemble reel shaft assemblies and strengthen back tension
- Decreased back tension of take-up and supply reel shaft assemblies.
- Tape spills when stopped from Rewind or Fast forward mode.
- Excessive slippage of felt clutch material in take-up and rewind reel shaft assemblies.
- Readjust slippage of felt clutch material. Replace defective reel shaft assembly if this readjustment is difficult
- Reels of different size are used. For example, 5" reel on take-up side and 7" reel on supply side.
- Always use reels of same size on both sides.
- Excessive slippage of felt clutch material in take-up and rewind reel shaft assemblies.
- Break does not function properly.
- Worn-out brake shoes
- Check and replace brake shoes.
- Oil attached to surface of brake shoes.
- Wipe off oil with cotton swab soaked in alcohol.
- Loose brake shoes
- Tighten brake shoes mounting screw.
- Brake lever does not function properly
- Check and re-adjust brake lever.
- Worn-out brake shoes
- Periodical clack noise when rewinding or fast forwarding tape
- Worn-out and rugged idler wheel.
- Check idler wheel.
- Worn-out and rugged idler wheel.
- Loud motor vibration.
- Loose motor mounting screw
- Tighten mounting screw
- Defective motor starting capacitor (C6)
- Replace C6.
- Loose oil cover mounting screw.
- Tighten mounting screw
- Loose motor mounting screw
- Squeaking noise when playing tape.
- Deposit of dust on heads.
- Clean heads.
- Recording tape is being charged with static electricity.
- Replace recording tape.
- Excessive heat on head surface after continued operation.
- Check tape head.
- Old and worn-out recording tape.
- Inspect recording tape.
- Inferior recording tape
- Use recording tape of good quality.
- Deposit of dust on heads.
- Automatic stopping device does not function.
- Automatic stop lever moves normally.
- Micro switch (SW-5) does not work properly
- Check SW-5.
- Micro switch (SW-5) does not work properly
- Automatic stop lever does not move or sticky.
- Broken lever spring or lever spring not in position.
- Check lever spring.
- Automatic stop lever sticks to rear deck panel
- Check rear side of deck sub-plate.
- Broken lever spring or lever spring not in position.
- Automatic stop lever moves normally.
- Cycle change switch does not move.
- No lubricant on cycle conversion lever.
- Relubricate lever.
- Eccentric or bent cycle conversion lever.
- Check cycle conversion lever.
- Capstan drive belt not on driving track of flywheel.
- Check capstan drive belt
- Loose motor bushing.
- Tighten mounting screw.
- Loose motor mount screw.
- Tighten mounting screw.
- Oil on motor bushing or on flywheel.
- Wipe off oil with cotton swab soaked in alchol.
- No lubricant on cycle conversion lever.
XIII. Connecting Diagram
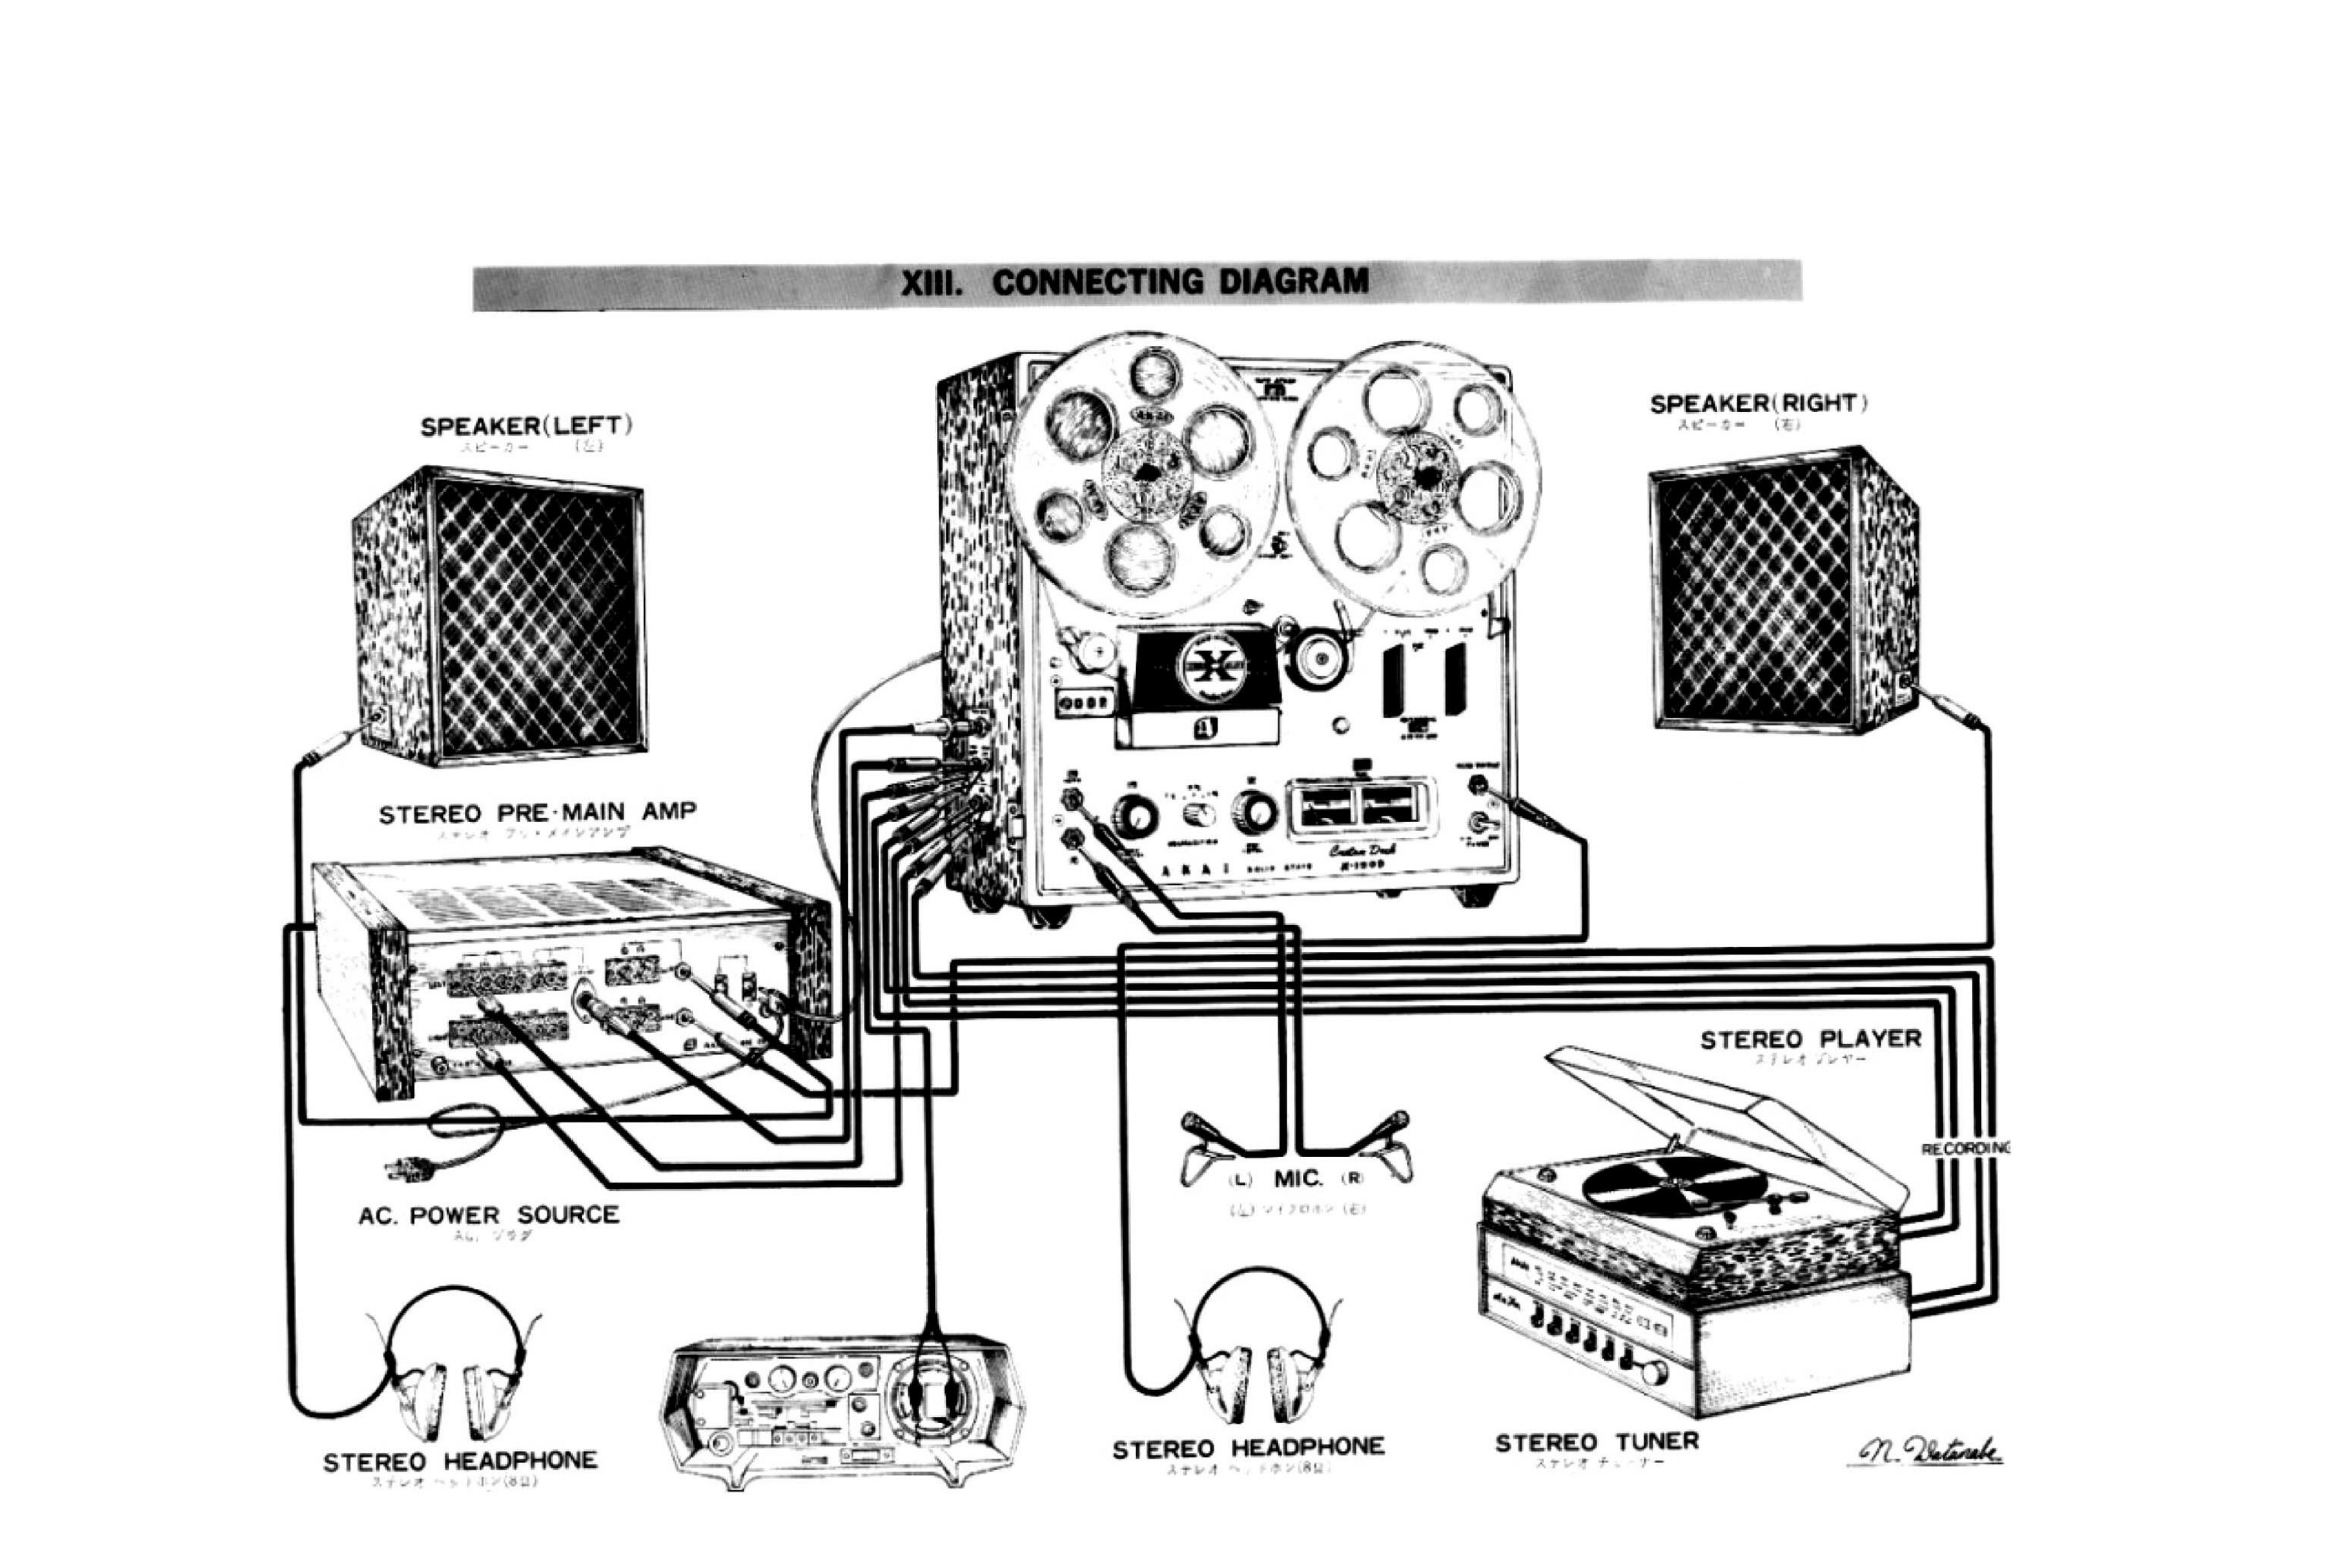 ⤢ zoomConnecting diagram: the X-150D reel-to-reel deck at center, wired to left and right speakers, a stereo pre-main amplifier, an AC power source, two stereo headphones, a stereo microphone pair, a stereo player (turntable), and a stereo tuner, with a handwritten signature at the bottom right of the sheet
- SPEAKER(LEFT)
- SPEAKER(RIGHT)
- STEREO PRE·MAIN AMP
- AC. POWER SOURCE
- STEREO HEADPHONE
- STEREO HEADPHONE
- (L) MIC. (R)
- STEREO PLAYER
- STEREO TUNER
- RECORDING