Scan pages 11–15
Operating Instructions: Playback & Recording
II.1. Threading the Tape
Place your recording tape on the SUPPLY REEL SHAFT (1) and the empty reel on the TAKE-UP REEL SHAFT (33).
Thread the tape as illustrated by the dotted line.
To keep the reels from falling down, lock the reels with the retainers provided on the top of REEL SHAFTS.
IMPORTANT:
If the automatic shut-off is required, thread the tape through the AS LEVER (26). If not, pass the tape directly onto the take-up reel. In this case, set the AS SWITCH (25) to "OFF".
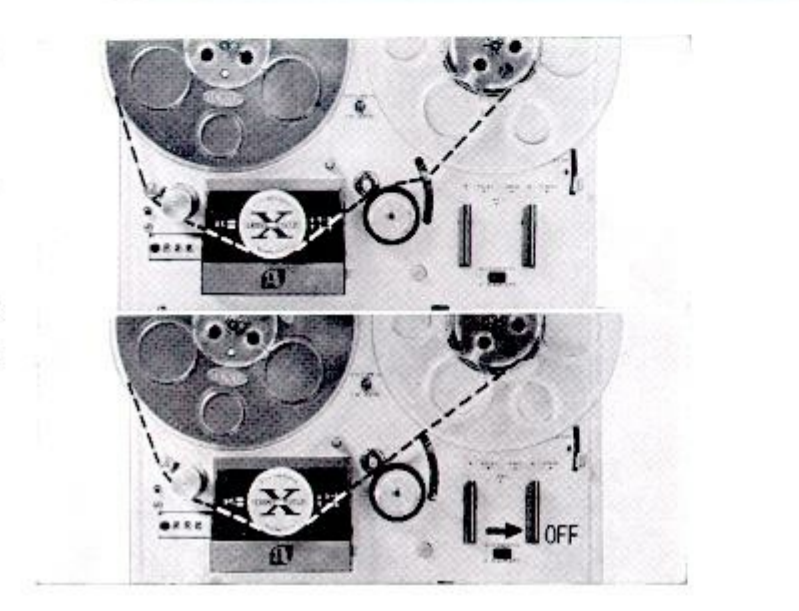 ⤢ zoomThreading photographs: the tape path drawn as a dotted line from the supply reel through the head block to the take-up reel — above with the tape threaded through the AS lever, below passing directly to the take-up reel with the AS switch arrowed to OFF
II.2. Stereo Playback
Connect the recorder to AC power source using the attached AC CORD.
- (A) Set the POWER SWITCH (22) to "ON".
- (B) Set the TRACK SELECTOR KNOB (6) to "STEREO".
- (C) Select the tape speed.
- (D) Set the EQUALIZER KNOB (18) to 7-1/2, 3-3/4 or 1-7/8, whichever is consistent with tape speed.
Now, put your pre-recorded tape on the recorder.
The Model X-150D does not include power amplifier nor loud-speakers. It, therefore, is necessary to provide an external stereo amplifier and speakers for stereophonic playback.
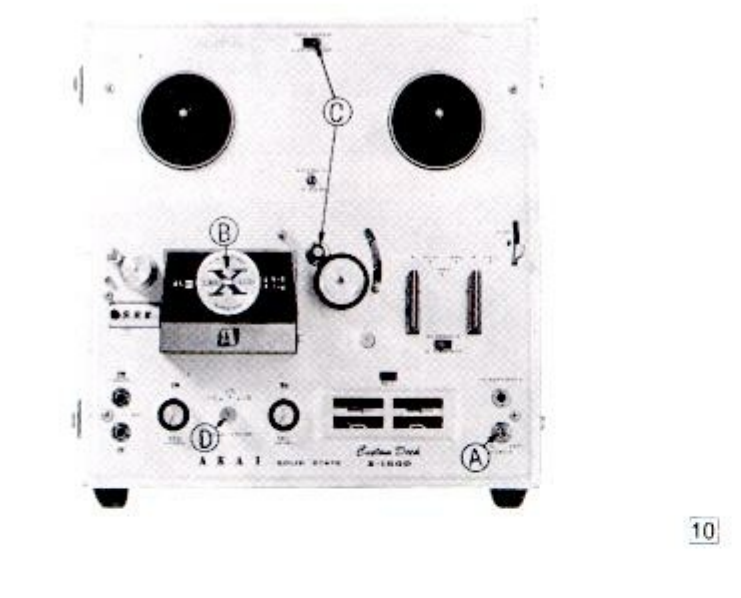 ⤢ zoomStereo playback: the deck front with letters A through D marking the power switch, track selector, cycle-and-speed area, and equalizer knob
- (E) Connect both LINE OUTPUT JACKS (38) and (39) to TAPE INPUT JACKS or AUX INPUT JACKS of the external amplifier. Connect two loud speakers to the power amplifier accordingly.
IMPORTANT:
The output level at the X-150D's output jack is maximum at 1.23 volts. Check your amplifier before operation with input terminals.
- (F) Set the RECORD/PLAYBACK KNOB (27) to "PLAY".
- (G) Adjust the volume of sound by the volume control knobs of the external amplifier.
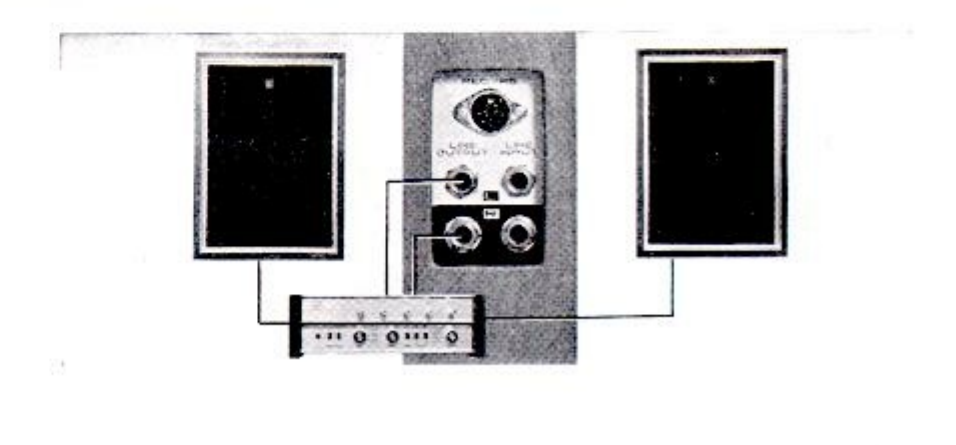 ⤢ zoomStereo playback connections: the jack panel wired to an external stereo amplifier flanked by two loudspeakers
II.3. Automatic Shut-Off
One of the exclusive features of the X-150D is the automatic shut-off function of the unit. Whenever the tape comes to the end, or is damaged by accident, the AS LEVER (26) drops down so that the functions of both deck and amplifier are automatically cut off. If automatic shut-off operation is desired, set the AS SWITCH (25) in "ON" position.
II.4. Instant Stop Control
To stop the tape momentarily on recording or playback, push the INSTANT STOP LEVER (29) as shown in the Figure. The lever will be locked in the stop position, and it can be released by lifting the curved tip upward. The INSTANT STOP LEVER (29) will not function when the recorder is in either fast forward or rewind operation.
An optimum recording level can be determined before starting the recording by using the INSTANT STOP LEVER (29) after the recorder is set in a normal recording mode of operation. Adjust the volume control while watching the VU METERS (19) and (20).
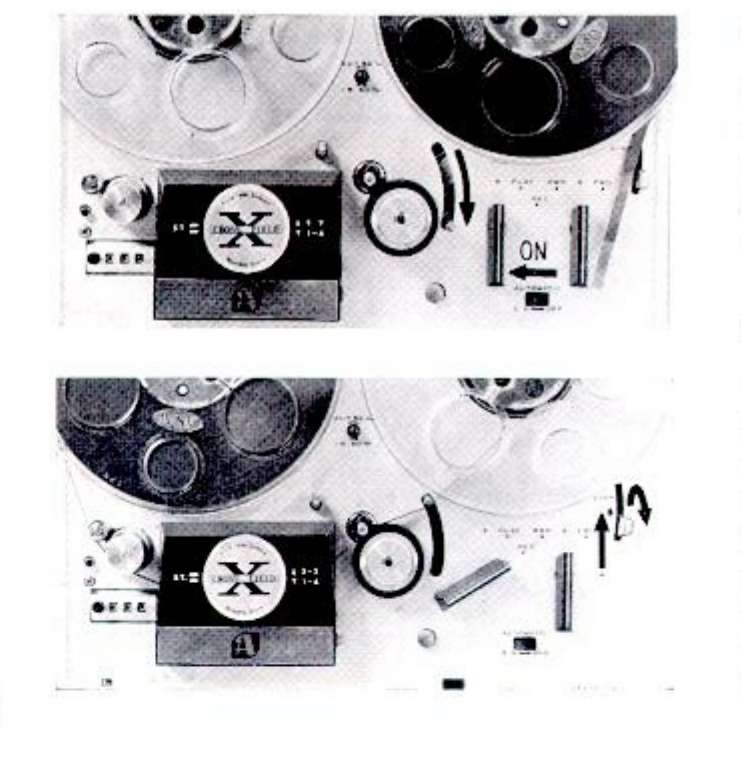 ⤢ zoomAutomatic shut-off and instant stop: two deck-top photographs, the AS switch arrowed to ON, and the instant stop lever pushed in with its release motion arrowed
II.5. Stereo Recording
- (A) Set the POWER SWITCH (22) to "ON".
- (B) Set the TRACK SELECTOR KNOB (6) to "STEREO".
- (C) Select the tape speed as desired.
- (D) Set the EQUALIZER KNOB (18) to 7-1/2, 3-3/4 or 1-7/8, whichever is consistent with tape speed.
- (E) Push the RESET BUTTON (10) and set the INDEX COUNTER (9) to "000". This counter provides reference numbers for locating specific points of the recordings on the tape.
Place the recording tape on the recorder.
Insert the MICROPHONE PLUGS into the MICROPHONE INPUT JACKS (14) and (15).
Keep the two microphones at least 7 feet apart. Thread the tape in the usual manner and push the INSTANT STOP LEVER (29) upward until it locks. Then, turn the RECORD/PLAYBACK KNOB (27) into "REC." position while depressing the RECORDING SAFETY BUTTON (24).
Microphone volume level may be adjusted and balanced by the RECORDING LEVEL CONTROL KNOBS (16) and (17). Normal recording should not exceed the black zone on VU METERS (19) and (20).
After an optimum recording level is determined, release the INSTANT STOP LEVER (29) to start stereo recording.
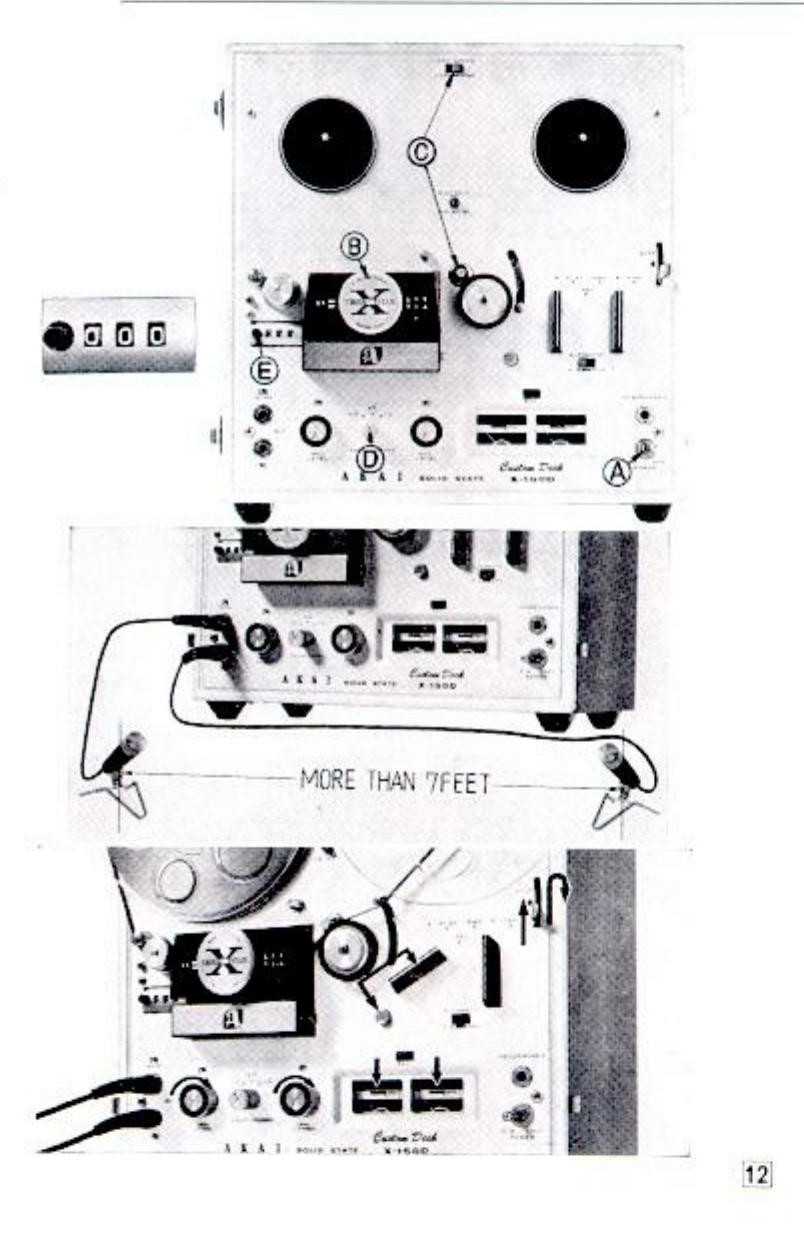 ⤢ zoomStereo recording: the deck front with letters A through E marking the controls in the order used, the index counter at 000, two microphones spaced more than 7 feet apart, and the recording-level knobs with the VU meters arrowed
II.6. Recording from Stereo Broadcast
Stereophonic broadcast programs may be recorded from two sets of radio receivers. This is accomplished by connecting LINE INPUT JACK (LEFT) (36) of Model X-150D to the voice coil terminals of the left-hand speaker and LINE INPUT JACK (RIGHT) (37) to similar terminals of the right-hand speaker of the respective radio set. Recording level is adjusted by RECORDING LEVEL CONTROL KNOBS (16) and (17).
II.7. Recording from Stereo Discs
To record from a stereo disc, a crystal pick up or ceramic pick up can be connected directly to the LINE INPUT JACKS (36) and (37). Magnetic cartridge output should be connected to a separate preamplifier and then to the LINE INPUT JACKS (36) and (37).
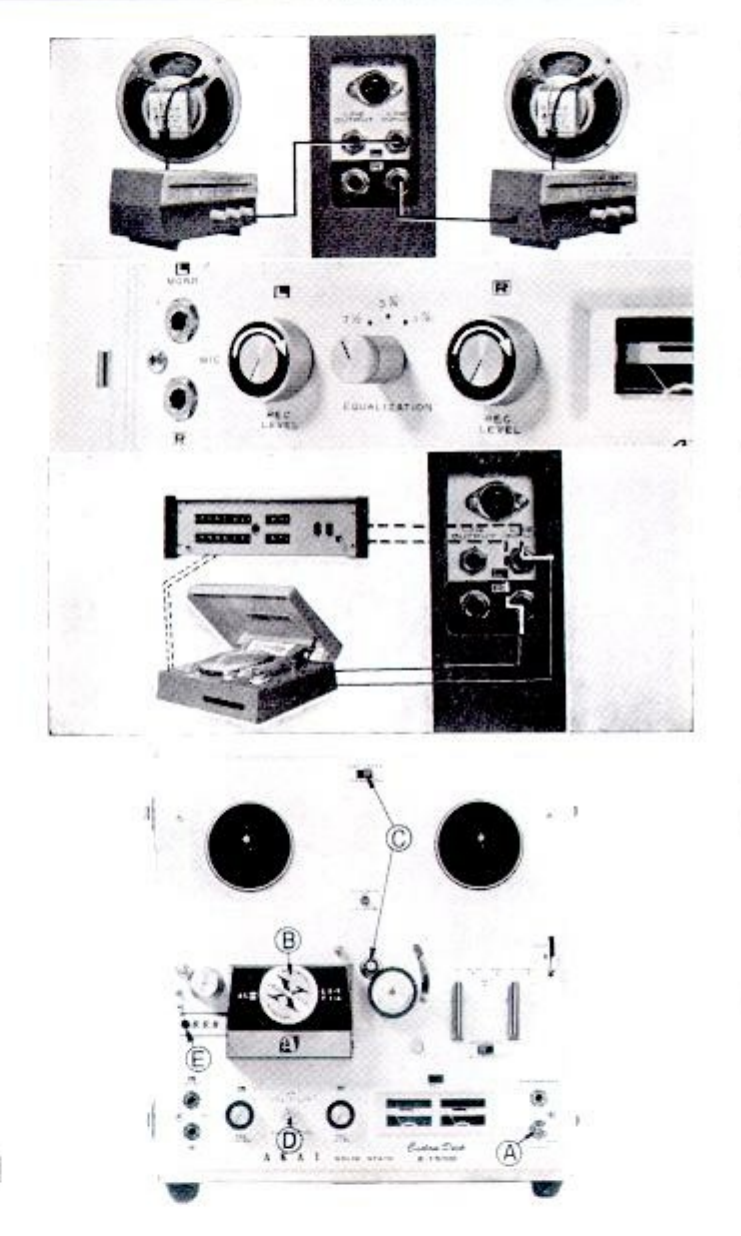 ⤢ zoomRecording from broadcast and discs: the jack panel wired to two radio receivers' speakers, the recording-level and equalization knobs, and a record player connected through the line inputs
II.8. Monaural Recording on Tracks No. 1-4
- (A) Set the POWER SWITCH (22) to "ON".
- (B) Set the TRACK SELECTOR KNOB (6) to "1-4".
- (C) Select the tape speed as desired.
- (D) Set the EQUALIZER KNOB (18) to 7-1/2, 3-3/4 or 1-7/8, whichever is consistent with tape speed.
- (E) Push the RESET BUTTON (10) and set the INDEX COUNTER (9) to "000".
In monaural recording, only the left channel amplifier is used. The right channel amplifier is not required for this operation.
The microphone plug should be inserted into the MICROPHONE INPUT JACK (LEFT) (14).
Place the recording tape on the recorder.
Push the INSTANT STOP LEVER (29) upward until it locks, and then turn the RECORD/PLAYBACK KNOB (27) into "REC" position while depressing the RECORDING SAFETY BUTTON (24). Adjust the RECORDING LEVEL CONTROL KNOB (LEFT) (16) to normal recording level, while watching the VU meter indicator of the left channel amplifier. VU meter reading should not exceed the black zone.
After a correct recording level is determined, release the INSTANT STOP LEVER (29) to start recording on track No. 1.
At the end of recording on track No. 1, reverse both tape reels for the next recording on track No. 4.
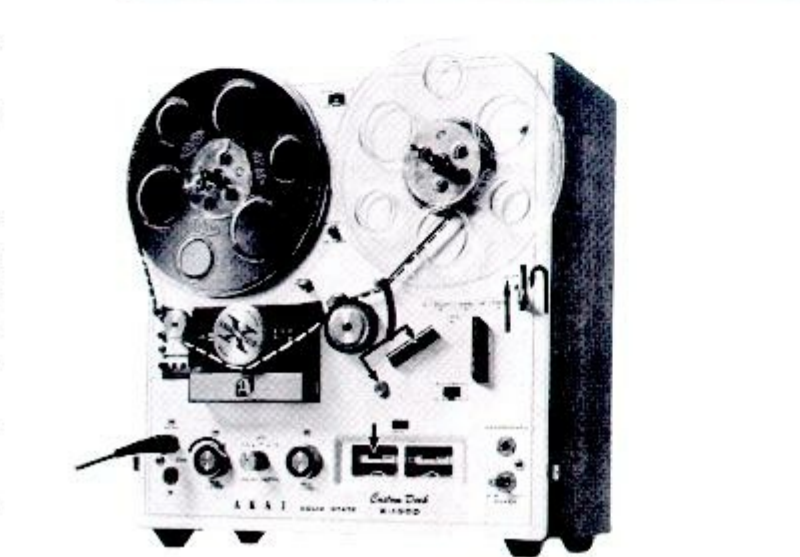 ⤢ zoomMonaural recording on tracks 1-4: the deck with a single microphone plugged into the left microphone input
II.9. Monaural Recording on Tracks No. 3-2
Set the TRACK SELECTOR KNOB (6) to "3-2". For the rest of operation, just follow the instructions given for recording tracks No. 1-4. Recording is made first on track No. 3, then on track No. 2 with both reels reversed.
To record from a disc player or an external amplifier monaurally, use the LINE INPUT JACK (LEFT) (36). A crystal pick up can be connected direct to the LINE INPUT JACK (LEFT) (36). When recording from an external amplifier, connect to the LINE INPUT JACK (LEFT) (36) from the TAPE OUTPUT of external amplifier.
To record from a radio, connect radio cable to the radio speaker or to the earphone jack. The cable plug should be inserted into LINE INPUT JACK (LEFT) (36).
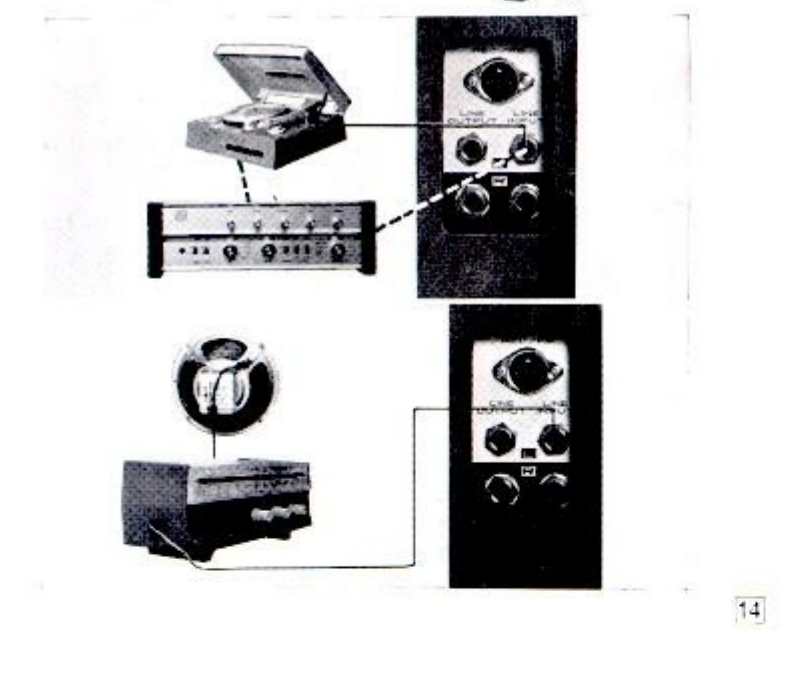 ⤢ zoomMonaural recording sources: a record player and amplifier, and a radio receiver, each wired into the left line input jack